Weatherproofing Operational Assets: Ensuring Sealing with Garage Seal Rubber
Source:https://garagedoorservicepro.com
Imagine waking up the morning after a brutal autumn rainstorm. You walk out to your garage to grab your tools, only to find a pool of murky water creeping toward your expensive table saw. Even worse, you notice a family of field mice has taken up residence in the corner, alongside a pile of windblown wet leaves. You look at your massive, expensive garage door and wonder: How on earth did all this get inside?
Over my 10+ years troubleshooting structural issues for homeowners, I have seen people spend thousands of dollars insulating their garage walls and buying high-end heaters. Yet, they completely ignore the two-inch gap right at the bottom of their garage door.
Your garage is more than just a place to park your car; it is a critical zone housing your operational assets, tools, and mechanical equipment. Treating weatherproofing as an afterthought is a costly mistake. In my experience, installing the right garage seal rubber is the single most effective, low-cost project you can undertake to protect your space from energy loss, moisture damage, and pests.
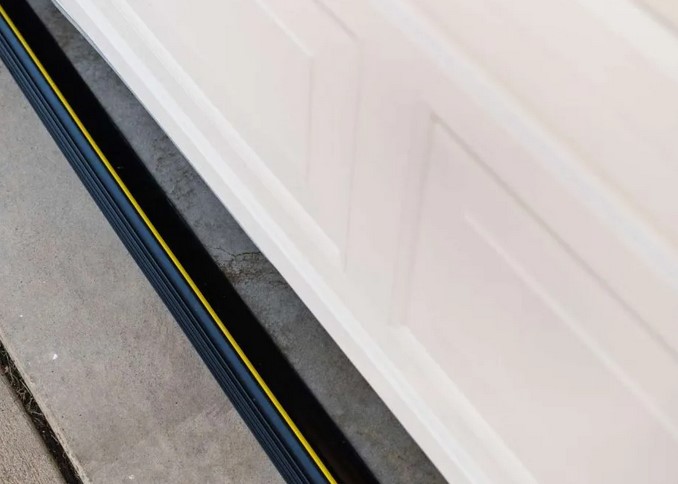
The Garage Door as a Thermal Sieve: Why Your Current Bottom Seal is Failing
Think of your garage door like a giant window. Even if the window pane itself is solid, if you leave it cracked open two inches at the bottom, the ambient temperature inside your home drops instantly.
The Illusion of a Flush Fit
Many homeowners assume that because a garage door is heavy, gravity automatically creates a tight seal against the concrete floor. It doesn’t.
Concrete slab floors shift, settle, and crack over time, creating subtle dips and waves. Your rigid garage door cannot bend to meet those imperfections. Without a flexible, heavy-duty barrier, you are essentially leaving a welcome mat out for drafty air, driving rain, and crawling insects.
Material Science: Choosing the Right Garage Seal Rubber
When you walk down the weatherstripping aisle at a home improvement center, the options can be dizzying. To make an educated choice, you need to understand the material properties of industrial sealants.
+-------------------------+----------------------------------+------------------------------------+
| Material Type           | Best Used For                    | Lifespan & Durability              |
+-------------------------+----------------------------------+------------------------------------+
| Vinyl (PVC)             | Mild climates, budget-conscious  | Low (Hardens and cracks in extreme |
|                         | projects                         | cold)                              |
+-------------------------+----------------------------------+------------------------------------+
| EPDM Rubber             | Severe weather, high temperature | High (Maintains elasticity from    |
|                         | fluctuations                     | -40°F to 300°F)                    |
+-------------------------+----------------------------------+------------------------------------+
| Silicone                | High-end residential, uneven     | Maximum (Incredibly resilient,     |
|                         | concrete floors                  | premium price point)               |
+-------------------------+----------------------------------+------------------------------------+
1. Vinyl (PVC) Seals: The Budget Temptation
Vinyl seals are cheap and readily available. However, as an expert who has torn out hundreds of these, I will give it to you straight: vinyl has poor thermal memory. In freezing winter temperatures, vinyl loses its flexibility, becomes brittle like a potato chip, and cracks under the weight of the closing door.
2. EPDM Rubber: The Professional Standard
EPDM (Ethylene Propylene Diene Monomer) rubber is a synthetic elastomer that stands up to severe operational abuse. It acts like a high-performance tire, remaining completely pliable in sub-zero winters and resisting UV degradation during scorching summers. When looking for a reliable garage seal rubber, EPDM is almost always my top recommendation.
3. Silicone Seals: The Premium Solution
Silicone offers the absolute highest level of elasticity. It compresses beautifully into uneven concrete gaps and bounces back to its original shape instantly when the door opens. It is highly resistant to chemical spills, oil, and road salt.
Anatomy of a Perfect Seal: Profiles and Track Configurations
A garage seal rubber cannot function alone; it relies on an aluminum retainer track mounted to the bottom section of your garage door panel.
Understanding the Profiles
The rubber element itself comes in various geometric profiles, designed to compress differently based on your specific floor conditions:
-
T-End / T-Style: The industry standard. The top of the rubber strip has two small “T” shapes that slide easily into a double-channel aluminum track.
-
U-Shape: When pulled into the track, the rubber forms a hollow “U” or loop. This hollow cushion acts as a shock absorber, compressing effortlessly to fill large gaps up to two inches deep.
-
Bulb Type: A circular, enclosed loop that works exceptionally well on flat, even concrete surfaces to block high-velocity wind drafts.
Step-by-Step Installation: Squaring Up Your Shield
Do not let this project intimidate you. If you can handle a tape measure, a hacksaw, and a cordless drill, you can complete this upgrade in less than two hours.
Step 1: Clean and Prepare the Track
Raise your garage door to eye level or lock it in place safely. If you have an existing, rotted seal, slide it out of the channel.
Pro Tip: Over years of exposure, dirt, spiderwebs, and aluminum oxidation build up inside the retainer tracks. Take a stiff wire brush and scrape out the tracks completely, then spray them down with a small amount of silicone lubricant or soapy water. Attempting to slide fresh, grippy garage seal rubber into a dry, dirty track is a recipe for a torn seal.
Step 2: Measure and Cut with Precision
Measure the total width of your garage door panel. When cutting your new aluminum retainer tracks, use a hacksaw to get a clean edge.
When cutting your EPDM or silicone rubber seal, always add 2 to 3 inches of excess length. Do not cut it flush with the door width right away. Rubber naturally contracts over time due to temperature changes; leaving a little extra material at the ends prevents the seal from shrinking away from the bottom corners of the doorframe later on.
Step 3: Feeding the Gasket
This step is much easier with two people. Have one person guide the rubber T-ends into the aluminum channel from one side, while the second person gently pulls the rubber strip down the length of the door.
Once the rubber spans the full width, tuck the excess 1.5 inches of overhang back into the hollow center of the U-loop on both sides. This creates a thick, padded corner block that seals the vulnerable outer edges of your garage door tracks.
The Invisible Threat: Top and Side Perimeter Seals
While the bottom seal stops water and rodents, your weatherproofing job isn’t complete without checking the perimeter.
Many homeowners install an immaculate bottom gasket only to find their garage still loses heat. Air is a fluid asset; if it cannot enter through the bottom, it will find its way through the sides and top header.
Always inspect your garage door stop molding. This is the vinyl weatherstripping mounted to the external wooden frame surrounding the door. When the garage door closes, the flexible flap of this molding should press firmly against the exterior face of the door panels, sealing the perimeter like a giant Tupperware lid.
Reclaim and Secure Your Workspace
Your garage shouldn’t be a drafty, damp holding cell for windblown debris and pests. By taking control of your home’s envelope and installing high-performance garage seal rubber, you protect your tools, regulate your home’s thermal efficiency, and transform your garage into a clean, year-round operational asset.
Are you currently noticing light peaking through the bottom of your garage door? What kind of climate challenges does your home face during the changing seasons? Drop your thoughts in the comments section below, and I’ll help you pick the perfect seal profile for your setup!