Basement Structural Integrity: Moisture Management via the Basement Moisture Barrier
Source:https://spycor.com
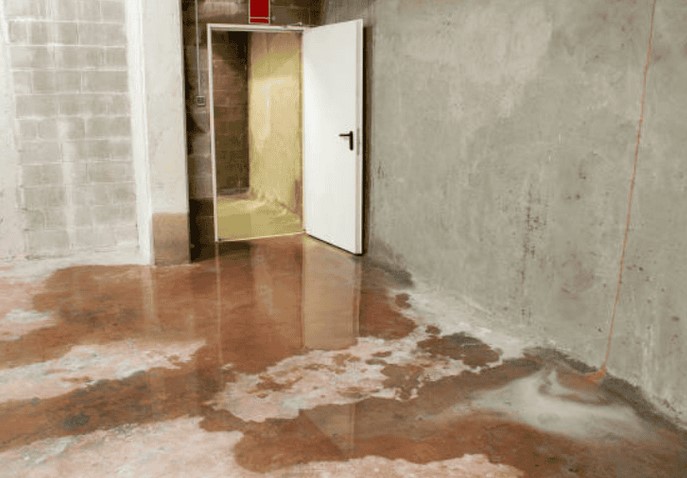
You pull open your basement door, take a step down, and there it is: that unmistakable, heavy, musty smell. You look around, but you don’t see any standing water or dramatic puddles. Yet, that damp air tells your nose that something is inherently wrong beneath your home.
Over my 10+ years of diagnosing foundation issues and remodeling lower levels, I’ve had hundreds of homeowners tell me, “My basement doesn’t leak, it just gets a little humid.” Here is the hard truth I always tell them: just because you can’t see liquid water doesn’t mean your home isn’t actively fighting off a subterranean invasion.
Concrete looks solid, but under a microscope, it behaves exactly like a dense, rock-hard sponge. It is riddled with microscopic capillaries that constantly draw moisture out of the surrounding earth and sweat it directly into your living space. If you want to finish your lower level or protect your foundation, skipping a high-performance basement moisture barrier is a recipe for structural rot, ruined drywall, and toxic mold.
The Silent Invasion: Understanding Hydrostatic Pressure and Capillary Action
To win the war against sub-grade dampness, we have to look at the physics of the soil surrounding your home. Your foundation is under constant attack from two hidden forces: hydrostatic pressure and capillary action.
The Sponge Analogy
Think of your basement foundation like a terracotta plant pot. When you pour water into the soil around the pot, the dry clay absorbs the moisture and slowly darkens as the water moves completely through the clay wall.
Concrete foundation walls do the exact same thing. When rain falls, the water table rises, creating intense hydrostatic pressure that forces water molecules through the porous concrete. This process, known as vapor transmission, happens entirely at a molecular level, turning your basement into a giant dehumidifier engine that continuously pulls moisture inward.
Material Science: Choosing Your Basement Moisture Barrier
In the home improvement niche, we classify vapor retarders based on their permeance rating (how much water vapor can pass through the material over a specific timeframe). To establish true moisture management, you need to understand the three primary types of barriers used in modern construction.
+-------------------------+----------------------------------+------------------------------------+
| Barrier Type            | Best Used For                    | Performance Metric (Perm Rating)   |
+-------------------------+----------------------------------+------------------------------------+
| Liquid-Applied          | Bare concrete block or poured    | Variable (Creates a seamless,      |
| Elastomeric Coatings    | foundation walls                 | mechanical bond with the masonry)  |
+-------------------------+----------------------------------+------------------------------------+
| Polyethylene Sheet      | Under subfloors and behind       | High Efficiency (Typically less    |
| Membranes (6-mil+)      | framed studs                     | than 0.1 perms; highly durable)    |
+-------------------------+----------------------------------+------------------------------------+
| Dimpled Plastic         | Sub-slab drainage and uneven     | Maximum Protection (Creates an     |
| Drainage Mats           | subterranean walls               | integrated air gap for drainage)   |
+-------------------------+----------------------------------+------------------------------------+
1. Liquid-Applied Elastomeric Coatings
These are heavy-duty, rubberized sealants that you roll or trowel directly onto bare masonry. Unlike standard interior paint, these elastomeric formulas penetrate deep into the concrete pores and expand, creating a flexible, monolithic shield that can withstand minor foundation settling without cracking.
2. Polyethylene Sheet Membranes
When framing walls or laying down a subfloor, a heavy-duty poly sheet is your best friend. For walls, a 6-mil polyethylene sheet is the baseline standard, but for basement floors, I always step my clients up to a puncture-resistant 10-mil or 15-mil virgin poly vapor barrier. It acts as an impenetrable shield between the cold concrete and your finished flooring material.
3. Dimpled Plastic Drainage Mats
This is the gold standard for high-risk zones. These heavy-gauge plastic sheets feature a molded, dimpled pattern. When anchored against the concrete, the dimples create a deliberate air gap or drainage plane, allowing any condensed water vapor to flow harmlessly downward into an interior perimeter drain or sump pump basin.
Step-by-Step Installation: Sealing Your Foundation Walls
If you plan to finish your basement, installing your basement moisture barrier onto the walls correctly is the single most critical structural step. Here is how to execute it like a professional field technician.
Step 1: Prep and Repair the Concrete Deck
You cannot install a barrier over a failing substrate. Inspect your bare concrete walls for efflorescence—that white, powdery crystalline salt deposit left behind by evaporating water.
Scrape it off completely with a wire brush and vacuum the dust away. If you find any active structural cracks, patch them using a high-strength hydraulic cement or an epoxy injection kit to stabilize the masonry before applying your barrier layer.
Step 2: Mechanical Roll-Out and Seaming
Unroll your membrane across the wall, starting from the top plate down to the floor. Use concrete masonry anchors or specialized sealing washers to mechanically fasten the sheet to the wall.
Pro Tip: The barrier is only as strong as its weakest joint. Never just overlap your sheets and call it a day. You must overlap your sheets by at least 6 inches and seal every single seam using heavy-duty, waterproof vapor barrier tape. If a single seam is left unsealed, moisture vapor will find it, condense, and pool behind your framing.
Step 3: Isolating the Perimeter Sills
Ensure your barrier extends all the way down to the floor slab and seals cleanly to the concrete deck. At the top of the wall, seal the barrier directly to your pressure-treated sill plate using an acoustical sealant or specialized butyl caulk. This creates an airtight envelope that isolates the entire sub-grade environment from your home’s upper framework.
The Floor Conundrum: Protecting Your Subfloor Investment
Many intermediate DIYers successfully seal their basement walls, but completely neglect the concrete slab beneath their feet. They lay down beautiful luxury vinyl plank (LVP) or engineered hardwood flooring, only to watch it buckle, warp, or grow black mold underneath three years later.
Even if your concrete floor feels bone-dry to the touch, test it before buying flooring. Tape a 2×2 foot square of clear plastic sheeting completely airtight to your bare basement floor using duct tape. Leave it for 48 hours. If the underside of the plastic is fogged with condensation or the concrete underneath has darkened, your slab is actively breathing moisture vapor and absolutely requires a dedicated floor-grade basement moisture barrier before any finishing can take place.
Finalizing Your Environmental Defense Strategy
True moisture management cannot rely entirely on a passive membrane barrier alone. A basement moisture barrier is your second line of defense; your first line of defense is keeping water away from your foundation entirely.
Ensure your exterior gutters are completely clean, your downspouts extend at least 6 feet away from your home, and the soil slope around your foundation grades away from the house at a minimum drop of 1 inch per foot. Pair these external grading habits with an internal high-performance vapor barrier, and your basement will remain dry, comfortable, and structurally secure for decades to come.
Are you preparing to tackle a basement remodel or trying to fix a stubborn humidity issue down below? What kind of foundation walls are you working with—poured concrete or older cinder blocks? Drop your questions in the comments section below, and let’s get your foundation locked down!