Structural Pavement Engineering: Ensuring Stability with the Patio Paver Base
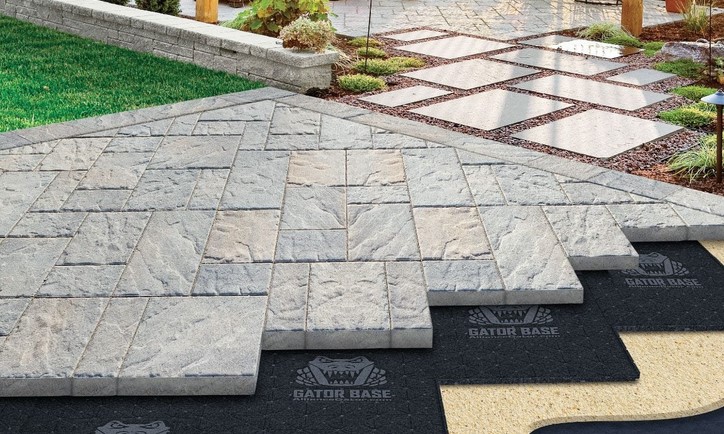
Source:https://www.familyhandyman.com
Two years ago, I took on a job to tear out a $15,000 backyard patio that had been installed by another contractor just eighteen months prior. The homeowner was heartbroken: beautiful, expensive natural stone pavers were dipping into treacherous sunken pockets, weeds were sprouting through wide gaps, and puddles of water pooled against her home’s foundation every time it rained.
When my crew lifted the first row of sunken pavers, the underlying problem was instantly clear. The previous installer had laid gorgeous $12-per-square-foot pavers over a flimsy two-inch bed of soft play sand poured straight onto uncompacted topsoil. There was no aggregate sub-base, no geotextile fabric, and zero drainage consideration.
We had to scrap the entire layout and start from scratch. In my over ten years of hands-on hardscaping, site grading, and structural pavement engineering, I’ve told every client the exact same thing: you don’t walk on your pavers—you walk on your patio paver base. The pavers are merely the decorative crust; the engineered aggregate foundation underneath does 100% of the heavy lifting.
The Physics of Soil Mechanics: Why Pavers Shift and Sink
To understand why hardscape projects fail, you must first understand how water and soil interact under structural loads. Topsoil is rich in organic matter and microscopic air pockets that compress when stepped on or rained upon.
Think of building a patio like building a high-rise skyscraper. If you build a skyscraper on soft mud, the weight of the structure causes uneven settling, tipping, and structural collapse. A properly installed patio paver base acts like the reinforced deep foundation of that skyscraper. It replaces soft, shifting dirt with angular stone aggregates that interlock under compaction, distributing point loads evenly across the subgrade below.
       POORLY BUILT PATIO                       ENGINEERED PAVER SYSTEM
 (Pavers Sinking & Spreading)                (Solid, Flat, Free-Draining)

    [ Paver ] [ Paver ] [ Paver ]             [ Paver ] [ Paver ] [ Paver ]
  +---------------------------------+       +---------------------------------+
  | Soft Sand & Uncompacted Soil    |       | Bedding Sand Layer (1 Inch)     |
  | (Traps Water, Expands, Settles) |       +---------------------------------+
  +---------------------------------+       | Dense-Graded Aggregate Base     |
                                            | (Compacted ASTM C33 / Crushed)   |
                                            +---------------------------------+
                                            | Geotextile Fabric & Subgrade    |
The Freeze-Thaw Cycle and Hydrostatic Pressure
In climates that experience winter freezing, water trapped directly beneath pavers expands by approximately 9% as it turns into ice. This expansion creates upward force—known as frost heave—pushing pavers out of alignment.
When the ice thaws in spring, the melted water turns the topsoil into mud, leaving empty voids underneath the stone. The pavers sink into these voids under foot traffic. A well-engineered gravel base allows groundwater to drain freely away from the surface, eliminating the water that drives frost heave.
An Anatomy of Layers: Deciphering Aggregate Gradations
Creating a resilient foundation isn’t about dumping random crushed rock into a hole. It requires layering specific aggregate gradations in a precise order.
+--------------------------------------------------------------------------+
|                  CROSS-SECTIONAL PAVER BASE PROFILE                      |
|                                                                          |
|   +------------------------------------------------------------------+   |
|   | 1. Concrete / Natural Stone Paver Units (2" to 2.375" Thick)    |   |
|   +------------------------------------------------------------------+   |
|   | 2. Concrete Sand Bedding Layer (ASTM C33 - Screeded 1" Flat)     |   |
|   +------------------------------------------------------------------+   |
|   | 3. Dense-Graded Crushed Aggregate Base (4" to 6" Compacted)      |   |
|   +------------------------------------------------------------------+   |
|   | 4. Heavy-Duty Non-Woven Geotextile Filter Fabric Barrier         |   |
|   +------------------------------------------------------------------+   |
|   | 5. Undisturbed Native Subgrade Soil (Compacted & Graded 2% Slope) |   |
+--------------------------------------------------------------------------+
1. Geotextile Polypropylene Fabric
Laid directly over the excavated dirt subgrade, non-woven geotextile fabric serves as a structural separator. It prevents tiny clay and soil particles from migrating upward into your clean stone base while allowing rainwater to pass downward freely.
2. Dense-Graded Aggregate (Base Layer)
Often called “Crushed Run,” “3/4-Minus,” or “Road Base,” this mixture consists of crushed stone ranging from 3/4-inch down to fine stone dust. When compacted with a mechanical plate compactor, the sharp, angular edges lock together tight, forming a dense stone slab that resists settling.
3. Bedding Sand (ASTM C33)
A crisp 1-inch layer of coarse, sharp concrete sand (never smooth play sand or mason sand!). This layer acts as a setting cushion that allows you to seat the pavers flat with a rubber mallet before final compaction.
Technical Specifications: Depth & Load Calculations
Calculating the exact excavation depth prevents premature settlement and ensures proper drainage slopes away from your home.
| Application Type | Required Aggregate Base Depth | Bedding Sand Depth | Minimum Slope Requirement |
| Pedestrian Patio / Walkway | 4 to 6 Inches | 1 Inch | 1/4 Inch per Foot (2% Slope) |
| Driveway / Heavy Loads | 8 to 12 Inches | 1 Inch | 1/4 Inch per Foot (2% Slope) |
| Pool Deck / Wet Areas | 6 to 8 Inches (Open-Graded) | 1 Inch | 1/4 Inch per Foot (2% Slope) |
Pro Tip: Always calculate total excavation depth by adding the height of your paver stone + 1 inch of bedding sand + the required compacted patio paver base thickness. For a standard 2.375-inch paver with a 4-inch base, you must excavate roughly 7.375 inches deep.
Step-by-Step Installation Protocol for Lasting Stability
To build a patio base that survives heavy foot traffic and changing seasons, follow this field-tested execution workflow:
+--------------------------------------------------------------------------+
|                     4-STAGE BASE PREPARATION FLOW                        |
|                                                                          |
|   +-------------------+      +-------------------+      +------------+   |
|   | 1. Excavation &   | ---> | 2. Fabric & Base  | ---> | 3. Mechanical|   |
|   |    2% Pitch Grade |      |    Lift Spreading |      |    Compaction|   |
|   +-------------------+      +-------------------+      +------------+   |
|                                                                |         |
|                                                                v         |
|                              +-------------------+      +------------+   |
|                              | 5. Edge Restraint | <--- | 4. Sand    |   |
|                              |    Pinning        |      |    Screeding|   |
|                              +-------------------+      +------------+   |
+--------------------------------------------------------------------------+
Step 1: Excavation and Slope Setting
Excavate the target area to your total calculated depth, extending the excavation 6 inches beyond the perimeter footprint of the final patio. Use string lines and a line level to establish a constant 2% slope away from any house foundation (dropping 1 inch vertical for every 4 feet of horizontal distance).
Step 2: Spreading and Lift Compaction
Never dump 6 inches of aggregate into a pit and try to compact it all at once! Compaction equipment can only consolidate stone in shallow layers. Spread your dense-graded aggregate in 2-inch lifts, running a heavy vibratory plate compactor over the surface 3 to 4 times per lift in overlapping passes.
Step 3: Sand Screeding
Place two parallel 1-inch outer diameter steel pipes across your compacted aggregate base. Pour coarse ASTM C33 concrete sand over the pipes, then pull a straight 2×4 wooden board across the pipes to screed a smooth, uniform 1-inch sand bed. Step carefully—do not walk on or compact the sand layer before laying pavers!
Expert Advice: Hidden Pitfalls to Avoid
Even eager DIYers can ruin a hardscape installation if they skip essential structural edge restraints. Keep these critical warnings top-of-mind:
Hidden Pitfall 1: Forgetting Heavy-Duty Edge Restraints
Patios do not fail from the center out; they fail from the outside edge sliding sideways. Without spiked, heavy-duty PVC or aluminum edge restraints anchored into the base with 10-inch steel landscape spikes, the sand bed beneath your outer pavers will wash away during heavy rain, causing the edges to bow outward and collapse.
Hidden Pitfall 2: Using Fine Stone Dust as Bedding Material
Avoid using fine limestone dust or quarry process dust for your 1-inch bedding layer. Stone dust traps moisture, turns into soft paste when saturated with groundwater, and prevents proper drainage, leading to efflorescence (white salt deposits) on your paver surfaces.
Build Your Outdoor Oasis on a Solid Foundation
Tackling a hardscape project is a rewarding investment that adds living space and structural value to your home. By taking the time to excavate properly, lay down geotextile separator fabric, and compact a dense patio paver base in shallow lifts, you guarantee that your stone surface remains smooth, level, and beautiful for decades to come.
Take a look at your yard this week. Are you planning a outdoor living upgrade, or do you have an old walkway showing signs of shifting and settling?