Renewable Property Visibility: Enhancing Identity with the Solar Address Sign
September 15, 2026
No Comments
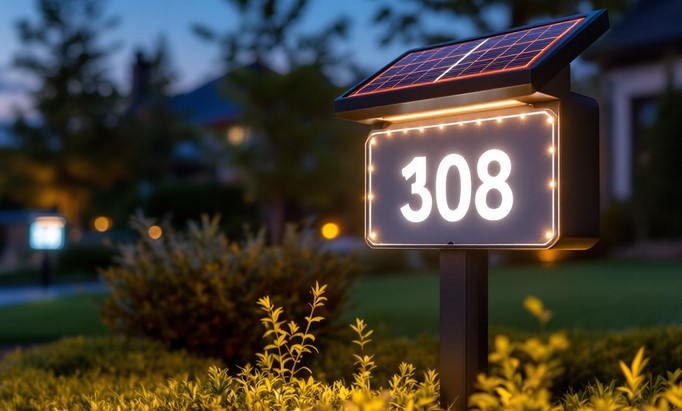
Source:https://www.paclights.com
It was a pitch-black November evening when an ambulance driver circled my client’s suburban block three times, desperately searching for a house number obscured by shadow. A family member was experiencing severe chest pains, yet emergency responders lost four critical minutes simply because the home’s address plaque was unlit and hidden behind a low-hanging maple branch.
That night was a sobering wake-up call for me as a home improvement specialist. We routinely spend thousands of dollars on high-end entry doors, architectural siding, and pristine hardscaping, yet we leave our home’s most essential identification marker completely in the dark.
Throughout my decade of evaluating residential exteriors and site logistics, I have seen standard reflective numbers fail under rain, fog, and nighttime conditions. Upgrading to an eco-friendly Solar Address Sign is not just an aesthetic upgrade for your curb appeal; it is a critical, self-sustaining safety upgrade that bridges functional exterior design with modern renewable technology.
The Operational Mechanics of Solar Luminescence
To understand why traditional house numbers fall short, we have to look at the physics of nighttime visibility and passive lighting. Standard reflective numbers rely entirely on ambient light sources—such as headlights arriving at specific direct angles—to reflect back.
Think of an unlit address sign like a billboard facing away from a highway. Unless a direct light beam hits it at the precise vector, it remains completely invisible to oncoming traffic, delivery drivers, and emergency vehicles.
+-------------------------------------------------------------+
|                 NIGHTTIME VISIBILITY COMPARISON             |
+-------------------------------------------------------------+
| Marker Type       | Power Source      | Night Visibility    |
+-------------------+-------------------+---------------------+
| Standard Plaque   | None (Passive)    | Low (Requires Direct|
|                   |                   | External Light)     |
| Hardwired Lighted | Home Grid (120V)  | High (Expensive     |
|                   |                   | Wiring Needed)      |
| Solar Address Sign| Solar Photovoltaic| High (Self-Powered &|
|                   | + Li-ion Battery  | Automatic Sensing)  |
+-------------------+---------------------+-------------------+
Photovoltaic Energy and Storage Architecture
A high-performance illuminated sign converts ambient sunlight into stored energy without drawing power from your home’s electrical grid:
-
Monocrystalline Photovoltaic Cells: These compact solar panels capture solar radiation during daytime hours, converting sunlight into direct current (DC) electricity even on overcast days.
-
Lithium-Iron Phosphate (LiFePO4) Storage: Modern units utilize durable rechargeable lithium batteries that hold enough capacity to power ultra-bright LEDs through 10 to 12 hours of continuous darkness.
-
Photocell Sensors (Dusk-to-Dawn Automation): Integrated photoresistors automatically trigger internal LED arrays the moment ambient light drops below a specific lux threshold.
Architectural Placement: Maximizing Sunlight and Sightlines
Installing solar hardware requires balancing two distinct requirements: maximizing exposure to direct sunlight and keeping numbers clearly visible from the street.
       [ SITE ARCHITECTURE EVALUATION ]
                      │
        ┌─────────────┴─────────────┐
        ▼                           ▼
[ Wall-Mounted Units ]      [ Ground-Stake Units ]
        │                           │
        ▼                           ▼
 Place near Primary Entryway   Position near Driveway Entrance
 (Eye-Level Sightlines)       (Unobstructed Solar Intake)
Wall-Mounted vs. Ground-Stake Configurations
-
Wall-Mounted Fixtures: Ideal for urban homes with minimal front lawn space. Mount the sign directly onto brick, siding, or masonry near the front porch light or garage entrance.
-
Ground-Stake Mailbox Posts: Excellent for sprawling suburban or rural properties where the main house sits back far from the road. Positioning a Solar Address Sign near the driveway entrance ensures high visibility for approaching vehicles long before they pull into the driveway.
Selecting the Right Hardware Engineering Specs
Not all solar fixtures are built to withstand severe weather. Selecting cheap plastic units leads to yellowed lenses, water intrusion, and battery failure after a single winter.
+-------------------------------------------------------------+
|                 MATERIAL & HARDWARE SELECTION               |
+-------------------------------------------------------------+
| Component Spec    | Premium Choice      | Low-End Alternative|
+-------------------+---------------------+--------------------+
| Enclosure Frame   | Anodized Aluminum / | ABS Recycled       |
|                   | Stainless Steel     | Thin Plastics      |
| Ingress Rating    | IP65 or IP67        | IP44 (Water Prone) |
| LED Array Type    | SMD Warm / Cool LED | Basic DIP Bulb     |
+-------------------+---------------------+--------------------+
Ingress Protection (IP) Ratings
For outdoor fixtures subjected to freezing rain, heavy snowfall, and scorching summer sun, pay close attention to the IP Rating:
-
IP65 Ingress Rating: Protects fully against dust ingress and low-pressure water jets from any angle.
-
IP67 Ingress Rating: Complete dust protection and resistance to temporary water submersion—ideal for low-lying ground stakes prone to heavy rain puddles.
Step-by-Step Installation Protocols
Deploying a solar illuminated sign requires basic hand tools and deliberate placement strategies to secure long-term utility.
+-------------------------------------------------------------+
|                  INSTALLATION WORKFLOW                      |
+-------------------------------------------------------------+
| [ STEP 1 ] Conduct 8-Hour Sunlight Mapping Audit            |
| [ STEP 2 ] Align High-Contrast Vinyl/Acrylic Number Plates |
| [ STEP 3 ] Secure Mounting Bracket into Masonry/Siding      |
| [ STEP 4 ] Charge Battery for 24 Hours Before First Activation|
+-------------------------------------------------------------+
-
Perform a Sunlight Audit: Before drilling holes into your exterior wall, monitor your proposed installation location throughout the day. Ensure the spot receives at least 4 to 6 hours of unshaded sunlight daily.
-
Apply High-Contrast Digits: Clean the sign’s acrylic faceplate with isopropyl alcohol before applying the included vinyl numbers. Ensure complete alignment and press out air bubbles to prevent moisture trapping.
-
Anchor the Mounting Hardware: Use a masonry bit for brick or concrete surfaces, driving expansion anchors tightly into place. If mounting to vinyl or wood siding, use stainless steel screws with rubber washers to keep water out of your wall cavity.
-
Initial Solar Charge Cycle: Leave the power switch turned off for the first 24 to 48 hours after installation to allow the solar panel to fully top off the battery before its initial nighttime discharge cycle.
Pro Tip: Choose a solar unit featuring dual-color temperature controls (3000K Warm White vs. 6000K Cool White). Cool white LEDs (6000K) cut through dense fog, rain, and snow significantly better than warm tones, providing superior legibility in bad weather.
Hidden Warning: Avoid mounting your solar sign directly underneath bright 120V porch lights or street lamps. The external ambient light can trick the sign’s internal photocell sensor into believing it is still daytime, preventing the LED display from turning on when you need it most.
Long-Term Maintenance and System Longevity
Solar fixtures are remarkably low-maintenance, but keeping them operating at peak performance requires occasional upkeep.
-
Clean Solar Panels Periodically: Dust, pollen, and falling leaves reduce photovoltaic efficiency. Wipe down the top solar lens every three months with a damp microfiber cloth.
-
Battery Replacement Cycles: Even high-grade LiFePO4 batteries degrade after 3 to 5 years of daily charge-discharge cycles. Replace internal rechargeable batteries promptly when you notice the illumination dimming before dawn.
Elevating Property Identity and Safety
Improving your home’s exterior isn’t limited to large-scale structural renovations—it extends to the functional details that make your property safe, recognizable, and welcoming. Installing a high-performance Solar Address Sign combines clean, modern aesthetics with self-sustaining technology, ensuring your home stands out clearly, day or night.
Is your home address clearly visible from the street after dark? Have you made the switch to solar exterior fixtures, or are you still relying on traditional unlit plaques? Share your thoughts, questions, or project ideas in the comments section below!