Precision Mechanical Fastening: Achieving Accuracy with the Nail Set Kit
November 5, 2026
No Comments
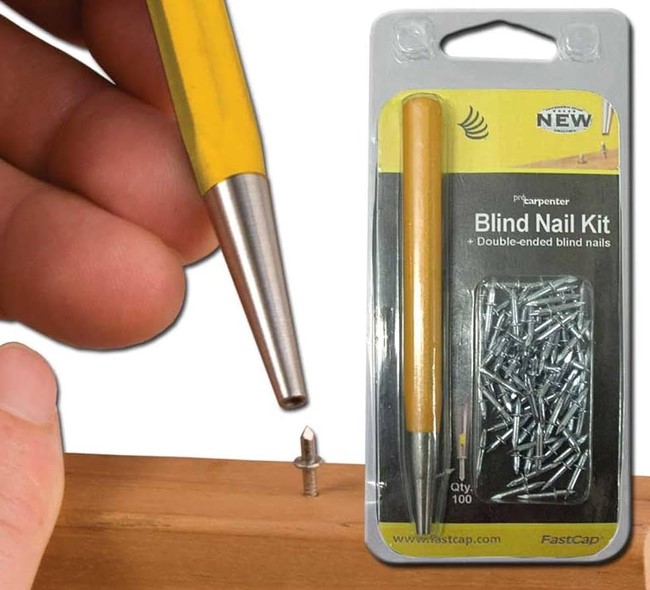 You have just spent hours meticulously measuring, cutting, and positioning a piece of expensive solid oak crown molding. You swing your smooth-faced finish hammer for the final drive, and in a fraction of a second, the heavy steel hammer head slips off the nail casing and slams directly into the pristine wood grain.
You are left staring at a deep, ugly half-moon dent—often called an “elephant footprint” in our trade—that no amount of wood filler or sanding will ever truly erase. I’ve seen eager homeowners and rookie carpenters throw away hundreds of dollars in fine trim lumber over this single, devastating mistake.
The secret to achieving seamless, cabinet-maker-quality trim installations isn’t swinging a hammer harder or relying entirely on pneumatic nailers. Mastering a simple, inexpensive nail set kit is the essential bridge between rough carpentry and fine architectural joinery.
What Is a Nail Set Kit and Why Is It Indispensable?
In fine finish carpentry, driving a finish nail or brad perfectly flush with a hammer face is nearly impossible without marring the surrounding wood surface. A nail punch or nail set acts as a hardened steel force transfer rod, allowing you to direct impact energy precisely onto the tiny head of a nail while keeping the large hammer head a safe distance away from the wood face.
A professional-grade nail set kit typically contains three to four cupped-tip steel punches color-coded or stamped by tip diameter—usually ranging from 1/32-inch to 3/32-inch.
+-----------------------------------------------------------------------+
|                       NAIL SET TIP SIZING GUIDE                       |
+--------------------------+---------------------+----------------------+
| Tip Diameter             | Color Code / Mark   | Recommended Fastener |
+--------------------------+---------------------+----------------------+
| 1/32-Inch (0.8 mm)       | Yellow / Fine       | 18G & 23G Pins/Brads |
| 2/32-Inch (1.6 mm)       | Blue / Medium       | 15G & 16G Finish     |
| 3/32-Inch (2.4 mm)       | Red / Large         | Casing Nails / 8d    |
| 4/32-Inch (3.2 mm)       | Green / Heavy Duty  | Large Siding Fasteners|
+--------------------------+---------------------+----------------------+
Think of a nail set like a surgical scalpel compared to a butcher knife. The hammer provides the raw power, but the nail set translates that raw kinetic force into surgical precision, counter-sinking the fastener just below the surface without disturbing adjacent timber fibers.
Anatomy and Metallurgy: Engineering for Impact Resistance
Not all steel punches are created equal. Understanding the manufacturing quality behind your hand tools prevents catastrophic tip shattering and slipping under heavy impact load.
High-Carbon Alloy Construction
Quality punches are drop-forged from high-carbon alloy steel and subjected to differential heat treatment. The striking face on top is tempered softer to prevent dangerous metal mushrooming when struck by a hammer, while the cupped tip is induction-hardened to resist deformation against steel nail heads.
The Significance of the Cupped Tip
Unlike standard pointed center punches, a true finish nail punch features a concave, cupped tip profile. This recessed center locks around the domed or rounded head of finish nails, preventing the punch from sliding off and scratching adjacent wood trim.
Knurled Grip Patterns
Precision strikes require complete hand control. Look for square-shank or deep cross-hatch knurled barrels that offer positive tactile feedback, even when working with sweaty or gloved hands in cold weather.
Step-by-Step Blueprint: Countersinking Finish Fasteners Perfectly
Using a nail set kit properly is a foundational muscle-memory skill. Follow this methodical four-step workflow to countersink finish nails cleanly every single time.
       [ STEP 1 ]             [ STEP 2 ]             [ STEP 3 ]             [ STEP 4 ]
+----------------------+   +--------------+   +----------------------+   +----------------------+
| Fastener Sizing &    |-->| Cupped Tip   |-->| Inline Alignment     |-->| Controlled Impact &  |
| Punch Match          |   | Engagement   |   | & Hand Anchor        |  | Recess Filling Check |
+----------------------+   +--------------+   +----------------------+   +----------------------+
Step 1: Matching the Punch to the Fastener
Select a punch tip size that matches or is slightly smaller than the head of the nail you are driving. Using a punch that is too large creates a oversized crater in the wood; using one that is too small can cause the punch to slip off the nail head.
Step 2: Anchoring Your Hand Position
Rest the pinky edge of your non-dominant hand firmly against the wooden trim piece to establish a stable reference anchor. Hold the punch body firmly between your thumb and index finger near the top third of the knurled barrel.
Step 3: Aligning the Axis
Place the cupped tip squarely over the exposed nail head. Align the shaft of the punch so it forms an exact straight line along the path of the nail’s penetration angle.
Step 4: Striking with Controlled Kinetic Force
Grasp your finish hammer near the balance point and deliver a sharp, controlled tap directly onto the striking face of the punch. Drive the nail head 1/16-inch to 1/8-inch below the wood surface.
Pro Tip: Stop driving the moment you feel the distinct solid “thump” change to a sharp ring. Driving fasteners too deep breaks wood grain sub-layers, reducing holding power and requiring excessive wood filler.
Expert Advice: Critical Pitfalls and Pro Guidelines
Over a decade of working in residential finish carpentry has taught me that simple mechanical oversights can ruin fine trim work instantly.
Hidden Warning: Never use a pointed center punch designed for metal drilling in place of a cupped nail set! Pointed center punches slip off domed nail heads instantly, tearing wood fibers and leaving deep gouges in your trim work.
Keep these core operational principles in mind throughout your build:
-
Mind Your Hammer Face: Always use a smooth-faced finish hammer when driving nails near trim. Waffled framing hammers will leave aggressive waffle marks on your lumber if you miss by even a millimeter.
-
Spring-Loaded Alternative Option: If you struggle with hammer coordination in tight corners, invest in a spring-loaded, hammerless nail set. These tools use an internal spring mechanism pulled back by hand to deliver up to 3500 PSI of striking force with zero hammer swings required.
-
Angle the Entry Hole: When face-nailing wide baseboards, angle fasteners slightly downward and toward each other (cross-nailing). This creates a mechanical wedge anchor that prevents trim from pulling away from wall studs over time.
Troubleshooting Common Fastening and Finishing Issues
If your fast-paced trim installation results in split moldings or bent fasteners, consult this quick reference matrix to isolate and correct the issue.
+---------------------------------------------------------------------------------+
|                        TRIM FASTENING TROUBLESHOOTING GUIDE                     |
+----------------------+--------------------------+-------------------------------+
| Symptom Observed     | Underlying Cause         | Recommended Corrective Action |
+----------------------+--------------------------+-------------------------------+
| Punch Slips Off Head | Mismatched Tip Size /    | Match tip size to nail head;  |
|                      | Flat Center Punch Used   | switch to cupped nail set     |
| Wood Splits at Edge  | Fastener Too Close to    | Pre-drill pilot holes or blunt|
|                      | Grain End Line           | nail points with a hammer     |
| Large Cratering      | Punch Tip Diameter Too   | Downsize punch tip to match   |
|                      | Large for Fastener       | exact nail head diameter      |
| Bended Nail Shaft    | Angle Strike / Off-Axis  | Pull nail; realign punch shaft|
|                      | Impact Pressure          | strictly parallel to fastener |
+----------------------+--------------------------+-------------------------------+
When setting nails in delicate hardwoods like maple or walnut, blunt the sharp point of your finish nail with a quick hammer tap before driving it. A blunted tip punches through wood fibers cleanly rather than wedging them apart, eliminating grain splitting near board ends.
Mastering the Details of Fine Carpentry
True craftsmanship lives in the small details that most people only notice when they are missing. Equipping your tool belt with a quality nail set kit empowers you to set fasteners accurately, protect high-end wood trim, and prep surfaces for seamless filling and painting.
Are you currently working on baseboards, crown molding, or custom cabinetry in your home? Drop your questions, tool setups, or current trim challenges in the comments below—I’d love to help you perfect your finish work!