Architectural Light Optimization: Enhancing Workspace Productivity with the Kitchen Skylight
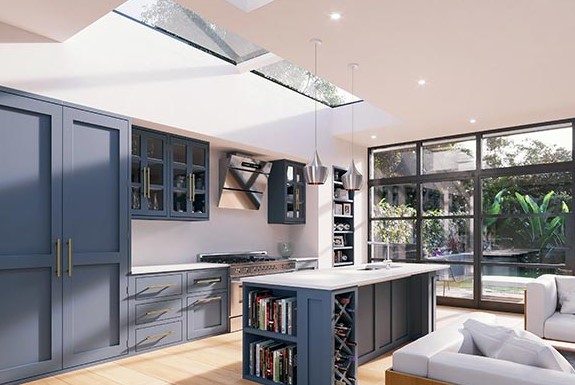
Source:https://www.eosrooflights.co.uk
I was once brought in to consult on a kitchen remodel where the homeowner was ready to spend over $8,000 on high-end under-cabinet LED strips, recessed task cans, and designer pendant fixtures. The kitchen sat in the center of a deep floor plan, boxed in by a dining room on one side and a covered porch on the other. It felt like cooking inside a cave, even at noon on a sunny summer day.
Instead of cluttering her ceiling with dozens of complex electrical circuits, I convinced her to redirect half that budget toward cutting a single, strategic ceiling opening directly above her prep island and installing a high-efficiency kitchen skylight.
The transformation was immediate and stunning. The dark, gloomy prep station was suddenly flooded with clean, natural full-spectrum daylight. Her artificial energy usage dropped by nearly 40%, and the natural light completely revived the warm wood tones of her cabinetry.
In my over ten years of hands-on structural remodeling, roofing installations, and interior day-lighting design, I’ve learned that natural daylight isn’t just an aesthetic feature—it is a functional architectural tool. When you want to optimize prep-zone visibility, reduce eye fatigue, and transform the focal center of your home, nothing compares to the strategic placement of a roof light shaft.
The Physics of Daylighting: Why Overhead Light Outperforms Side Windows
To understand why a roof window transforms a culinary workspace so drastically, you have to examine how light rays enter a room. Traditional vertical wall windows cast directional light that drops off rapidly as you move deeper into a room, creating harsh shadows and high-contrast glare.
Think of a traditional side window like a flashlight held at arm’s length across a dark room—it illuminates whatever it directly faces, but casts long, dark shadows behind every appliance, block, and countertop item. A kitchen skylight, on the other hand, acts like an enormous overhead softbox studio light. It floods the entire horizontal plane evenly from above, virtually eliminating the shadows cast by your body as you lean over cutting boards and cooktops.
       SIDE WINDOW ILLUMINATION                   OVERHEAD SKYLIGHT ILLUMINATION
    (Harsh Shadows, Deep Contrast)                (Even Horizontal Task Coverage)

           Direct Rays                                   Direct Rays
                \                                             |
                 \                                            v
  +-----------------------+                    +-----------------------+
  |  Countertop           |                    |  Countertop           |
  |  [User] ===> SHADOW!  |                    |  [User] (No Shadow!)  |
  +-----------------------+                    +-----------------------+
Full-Spectrum Sunlight and Task Visibility
Natural daylight carries a Color Rendering Index (CRI) of 100, providing pure, accurate color representation that artificial bulbs struggle to match.
This high-CRI light reduces eye strain during intricate kitchen prep, helps you accurately judge the freshness and doneness of foods, and triggers the body’s natural circadian rhythm, boosting daytime alertness and mood during morning meal prep.
Deciphering Skylight Types: Deck-Mounted vs. Curb-Mounted vs. Sun Tunnels
Selecting the correct structural framing design depends on your roof pitch, ceiling construction, and overall budget parameters.
+--------------------------------------------------------------------------+
|                     SKYLIGHT STRUCTURAL DESIGNS                          |
|                                                                          |
|   +---------------------------------+  +------------------------------+  |
|   |      DECK-MOUNTED SKYLIGHT      |  |     CURB-MOUNTED SKYLIGHT    |  |
|   |  * Low-profile direct-to-sheathing| |  * Sits on a 2x4/2x6 wood curb |  |
|   |  * Ideal for pitched roofs      |  |  * Essential for flat/low-slope|  |
|   |  * Factory-flashed weather seal |  |  * Easy leak-proof replacement|  |
|   +---------------------------------+  +------------------------------+  |
+--------------------------------------------------------------------------+
1. Deck-Mounted Skylights
Engineered to integrate directly onto the roof sheathing deck, deck-mounted units feature an integrated insulated frame that creates a streamlined, low-profile exterior appearance.
-
Best For: Standard pitched roofs ($14^\circ$ to $85^\circ$ slope) with asphalt shingles or tile.
-
Key Advantage: Excellent energy efficiency ratings and a sleek, low-profile roof appearance.
2. Curb-Mounted Skylights
Designed to sit atop an elevated $2\times 4$ or $2\times 6$ wooden box frame (the curb) built directly onto the roof deck structure.
-
Best For: Flat roofs, low-pitch roofs, or metal roofing systems where water pooling is a potential risk.
-
Key Advantage: Simple installation mechanics and easy unit replacement without disturbing the surrounding roof membrane.
3. Tubular Daylighting Devices (Sun Tunnels)
Utilizes a small exterior roof dome coupled with a highly reflective, mirror-like aluminum tube that routes sunlight down into a ceiling diffuser lens.
-
Best For: Small kitchens, pantries, or interior spaces where structural roof trusses prevent building a full drywall light shaft.
Performance Metrics: Glazing, U-Factor, and SHGC
Choosing glass for your overhead light fixture requires balancing thermal insulation against solar heat gain to keep your kitchen comfortable year-round.
| Performance Metric | Double-Pane Argon-Filled Low-E | Triple-Pane Laminated Low-E | Basic Acrylic Dome (Plastic) |
| U-Factor (Insulation Quality) | $0.24 – 0.28$ (High) | $0.15 – 0.18$ (Superior) | $0.50 – 0.70$ (Poor) |
| SHGC (Solar Heat Gain Coeff.) | $0.20 – 0.25$ (Low Heat) | $0.18 – 0.22$ (Ultra Low) | $0.60 – 0.82$ (High Heat) |
| Impact / Shatter Resistance | Laminated Glass (Safe) | Reinforced Laminated | Prone to Cracking / Yellowing |
| Sound Attenuation (STC) | High (Blocks Rain Noise) | Superior (Acoustic Barrier) | Low (Noisy in Heavy Rain) |
Pro Tip: Always specify laminated glass for overhead installations. While tempered glass is strong, if it ever shatters, it breaks into small tumbling pebbles. Laminated glass features a clear vinyl interlayer that holds shattered glass fragments securely in place, keeping your prep surfaces safe below.
Operational Integration: Light Shaft Architecture & Ventilation
Building a proper light shaft between your roof opening and kitchen ceiling dictates how daylight disperses across your workspace.
+--------------------------------------------------------------------------+
|                     4-STAGE SKYLIGHT PLANNING FLOW                       |
|                                                                          |
|   +-------------------+      +-------------------+      +------------+   |
|   | 1. Orientation    | ---> | 2. Structural     | ---> | 3. Shaft   |   |
|   |    & Solar Audit  |      |    Header Framing |      |    Design  |   |
|   +-------------------+      +-------------------+      |    Splay   |   |
|                                                         +------------+   |
|                                                                |         |
|                                                                v         |
|                              +-------------------+      +------------+   |
|                              | 5. Blinds & Sensor| <--- | 4. Step    |   |
|                              |    Integration    |      |    Flashing|   |
|                              +-------------------+      +------------+   |
+--------------------------------------------------------------------------+
Flare the Light Shaft Walls
When framing the ceiling opening, avoid building a straight, vertical drywall box down to the ceiling. Instead, splay the shaft walls—keep the top wall perpendicular to the roof, but angle the bottom wall toward the kitchen interior. This angled flare bounces incoming light rays deeper into the room, spreading natural daylight across a wider footprint.
Venting Skylights for Moisture and Heat Extraction
Kitchens generate significant quantities of steam, humidity, and cooking odors. Installing a venting kitchen skylight creates a natural thermal chimney effect (the stack effect). Opening the roof vent allows trapped hot air, moisture, and cooking smoke to vent rapidly through the ceiling, pulling cooler, fresh air in through lower wall windows.
Expert Advice: Hidden Pitfalls to Avoid
Even experienced contractors can compromise an installation if they ignore proper flashing and moisture mitigation details. Keep these field warnings in mind:
Hidden Pitfall 1: Relying on Mastic or Caulk Instead of Step Flashing
Never rely on roofing cement, silicone, or spray foam to seal a skylight to your roof deck! Sun exposure degrades elastomeric caulks, leading to catastrophic leaks within 12 to 24 months. Always use factory-engineered, step-flashing kits made of interlocking aluminum plates that weave directly between shingle courses.
Hidden Pitfall 2: Neglecting the Vapor Barrier in High-Humidity Areas
Hot, moist air from cooking rises directly into the cool drywall light shaft. If you do not install a continuous air/vapor barrier behind the shaft’s drywall insulation, warm moisture will condense on the cold framing studs inside the attic wall, causing hidden mold growth, drywall blistering, and wood rot.
Elevate Your Culinary Space
Transforming a dark, utilitarian kitchen into a bright, inviting workspace doesn’t require endless rows of artificial light fixtures or costly exterior wall teardowns. Integrating a high-performance kitchen skylight brings full-spectrum daylight directly into the heart of your home, reducing energy costs, enhancing task visibility, and elevating your daily culinary routine.